
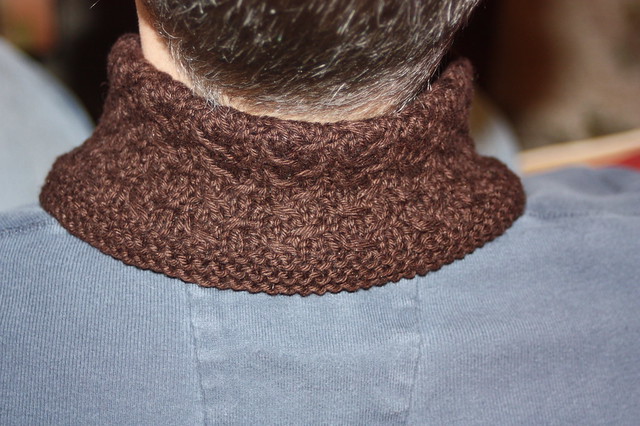
Manly Collar (originally published Winter 2008)
Materials:
1 skein DK weight yarn (I used Knit Pick’s CotLin and at 123
yards I still had some left), get more if you are making a larger collar....
Size US7 needles (straight or
circular but I found the circs easier to maneuver) or size required to
get-gauge
Tapestry needle
One Button (I think it was 5/8")
Gauge: approx 5 sts/inch in stockinette, approx 5.5 sts/inch
in pattern
Finished size: about 6” wide by 19” long after blocking.
Pattern stitch (adapted from Grumperina’s Shifting Sands Scarf):
Worked over 5 stitches and 4 rows:
Row 1 (RS): *1/2LC, K2,
repeat to end
Row 2 and 4: purl
Row 3: *k2, 1/2RC, rep to end

Pattern:
CO 105 sts loosely using whatever method you like to give
you a nice-edge, I like to use the long-tail cast on because I can keep it nice and
loose.
Knit four rows (garter stitch border), then purl one row (WS)
Row 1 (RS): K5, begin pattern stitch (above) and repeat until 5 stitches
remain, K5.
Row 2 (and all WS rows except button hole row): K5, follow pattern to last 5
sts, K5
Row 3 (RS): K5, follow pattern stitch and repeat until 5 stitches
remain, K5.
Next row add buttonhole (WS): K5, P2, bind off 3 sts, purl to last 5 sts, k5
Next row: K5, continue in pattern (row 1 again) to your bind-off gap, use
backward-loop cast on to add 3 sts, k7.
Continue following pattern, keeping the 5-stitch garter stitch
border on each edge, and the pattern stitch in the middle. When piece is approx 5” tall ending with a row 1 or 3, change
to garter stitch again for four rows.
Bind off in your favorite manner.
Finishing: Block the collar and then weave in ends after it has dried. To sew on the
button I folded the rectangle in half lengthways and wrapped the collar around
my model’s neck, then placed a small pin (careful not to nick your model!)
where the button hole is. Then I sewed the button on where the pin was.
Abbreviations:
1/2LC: slip 1 st to cable needle and hold in front, k2, then
knit 1 from cable needle
1/2RC: slip 2 sts to cable needle and hold in back, k1, then k2 from cable needle
Note: If you take the time to learn Grumerpina’s “Cabling
without a cable needle” you will find it worth the time spent! Trust me! (http://www.grumperina.com/cables.htm)
If you would like to make this collar for a neck larger than 15", increase the number of cast-on sts by 5 for the number of inches you want to increase (i.e. if you want to increase to 16" increase by 5 sts). If you would like the collar to be a little taller, knit a few more pattern-rows before placing your button hole and add a few more rows to the end before working your final garter-stitch border.
*errata: There was an issue with the 5th row (first row after the garter edge) where I neglected to point out the 5 stitch garter edges! So after knitting four rows, the next row: k5. p95, k5, then continue as instructed.
*errata: There was an issue with the 5th row (first row after the garter edge) where I neglected to point out the 5 stitch garter edges! So after knitting four rows, the next row: k5. p95, k5, then continue as instructed.
No comments:
Post a Comment